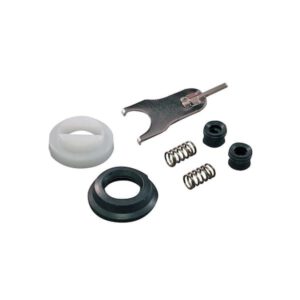
Faucet repair often involves replacing rubber or neoprene seals and washers. These can be purchased at most hardware stores or in premade kits designed for the specific faucet brand.
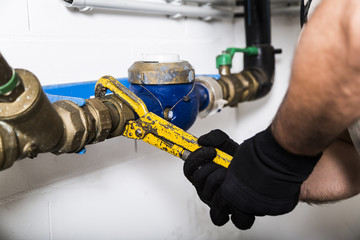
Before beginning any faucet repair, shut off the water supply valves under the sink by turning them clockwise. Also, close the drain to prevent any small parts from falling into the sink. However, if you need some professional help, contact Plumber The Woodlands.
Located on all sides of a cartridge-style faucet, O-rings ensure the seal stays in place. When a rubber O-ring is damaged, the water leaks and the fixture no longer works correctly.
Luckily, changing O-rings is an inexpensive and simple repair to fix your faucet. Before you begin the repair, turn off the water supply valves underneath the sink. This allows the sink to drain and prevents you from accidentally removing or damaging other components during the repair.
Once the water is off, you can remove the handle and disassemble the faucet. Verify that you have the correct screwdriver for each screw securing the handle. You may have standard flathead screws, or you may need a hex set screw. If you have trouble removing the screw, try using penetrating oil.
When assembling and installing O-rings, it is important to use the right tool for each step to avoid damage to the rubber and assembly. Using the wrong tools can cause stretching and twisting, resulting in an O-ring that does not provide the proper sealing pressure. Using the wrong tools can also cause damage to the threaded holes where the O-rings are installed. Using an O-ring mounting kit will allow you to install and remove the O-rings more easily without causing any damage.
O-rings are manufactured in a wide variety of sizes to meet the needs of various applications and production environments. An O-ring’s size is defined by its internal diameter and cord thickness. The larger the internal diameter, the bigger the O-ring. The thicker the cord, the more resilient the O-ring will be. Various materials are used to manufacture O-rings, depending on the application and environment. Some application environments require an O-ring to withstand high temperatures or harsh chemicals, while others demand low temperature resistance or anti-static properties.
After replacing the O-rings, reassemble the faucet and restore the water supply lines. Ensure the adjusting ring is tightened properly by turning it clockwise with the spanner tool included in the faucet repair kit. If you still experience leaking at the spout, replace the seats and springs or the entire cartridge. Be sure to take the old cartridge with you to a home center or hardware store so you can find an exact replacement. Before reassembling the cartridge, apply plumber’s grease to the new O-rings. This will make it easier to push the cartridge back onto the spout assembly.
Valve Seats
The valve seat is a ring-shaped component that provides the sealing surface for a faucet’s closure member, keeping water or gas from leaking out. It’s typically made from a durable material that can withstand high temperatures and pressures as well as resist corrosion in chemically-based environments. The seat can be either integral or a separate piece that fits into the valve body and is attached by a set screw.
Valve seats can be made of metals such as copper, bronze, or cast iron, or synthetic materials like PTFE (polytetrafluoroethylene), which is used in a number of different industries for its resistance to chemicals, high temperature capability, and low electrical conductivity. In addition, a variety of other elastomers and polymer compounds can also be used for a wide range of applications.
When a valve seat becomes damaged, it can no longer form a watertight seal between the valve stem and the spout, leading to a constant drip from the faucet handle. In some cases, the problem can be solved by simply cleaning the spout and valve mechanism to remove sediment and mineral buildup. But in other situations, the valve seat may need to be replaced.
Most faucets have removable valve seats, and you can tell by looking for an area that looks like a hexagonal hole or a slot that accepts a screwdriver. If the valve seat isn’t removable, you can try re-grinding it with a seat grinder, or “dresser,” available at most plumbing and hardware stores. This tool is designed to cut a new groove into a worn seat, but be careful not to use it for too long or with too much pressure.
To avoid damaging the valve seat, you should always turn off the water supply before attempting any disassembly or removal of the faucet. Also, be sure to cover the drain with a towel to catch any parts that drop during the process. Then, remove the washer, O-rings, and bit screws and carefully unscrew the handle and compression valve from the spout, taking careful notes to help you reassemble them in the correct order. Once you’ve completed the repair, turn the water back on and test the faucet for leaks.
Washers
Generally, washers are circular and are used to suction the faucet stem to the body of the faucet. They can be made from rubber, silicone, or Teflon. Replace washers every four to five years unless they are cracked or broken. When replacing a washer, make sure that it is an exact match to the old one, or the faucet will leak. A little dab of non-hardening teflon paste on the new washer helps it sit properly on the valve stem.
A leaking single-handle disc faucet might have a round ridge on the end of the faucet stem that presses to close the valve. A corroded or worn-down round ridge on the stem will cause water to leak. Replace the stem washer, and the round ridge will seal tight again.
In cartridge-type faucets, there is a rubber or nylon washer on the bottom of the cartridge that sits on top of the valve seat. It is held in place by a small brass screw. The washer may be pushed out by the seat ring, or it may simply be pulled out. In either case, you will need to get a replacement from your hardware store. Ensure that it is an exact match to the original washer, or it will not sit correctly on the seat and cause another leak.
If you are changing out the washer, also change the washer screw. It’s a good idea to take the old screw with you to the hardware store to make sure you have an exact replacement for it.
When returning the faucet to service, be careful not to overtighten the handle nut. If the nut is too tight, it will crush and crack the valve stem, and then you’ll need to remove it and start over. Also, be careful not to use a washer that is too big, or it will not fit snugly in the recessed pan in which the valve stem assembly rests. Your plumbing supply dealer will show you sizes of Hose Bibb Washer Retainers so you can choose the right one for your application.
Cartridges
Cartridges control the flow of water out of a faucet by adjusting the temperature and volume of the water. They are used in both shower and tub faucets to control the water temperature and prevent hot or cold water from spraying out of the spout and onto your skin (called scalding). There are two types of cartridges: a quarter-turn ceramic disk cartridge and a thermostatic cartridge.
Both types of cartridges last for years, but over time they will deteriorate and require replacement. In addition, hard water deposits can build up on the cartridges and impede their function, especially when turning the handle. Replacing both the cartridges and O-rings will improve the function of your faucet and make it more durable.
To replace the cartridge, first turn off the water supply by opening the shutoff valve under the sink. Then remove the faucet handle with a screwdriver or Allen wrench. Once the faucet is empty, remove the decorative cap on the escutcheon and unscrew or detach the set screw or Phillips-head screw. Once the handle and escutcheon are removed, you should be able to see the cartridge retaining nut or clip. Remove this and set it aside with the other pieces you have removed.
Once the retaining nut or clip is removed, you should be able to pull the cartridge straight up out of the faucet body. Be careful not to damage the rubber seals on the cartridge and, if necessary, replace them with new ones. Depending on the style of your faucet, there may be a plastic pivot stop or a keyway ring that sits inside the cartridge to direct its movement. If so, be sure to note its orientation and copy it when you reinstall the cartridge.
Insert the new cartridge into the faucet, aligning any tabs or pegs on it with the corresponding notches in the faucet body. Place the retainer nut, clip, or screws back on the cartridge to hold it in place, and replace the handle and escutcheon. Then reinstall the setscrew or screw and set screw on the faucet handle, tightening by hand only to avoid damaging the O-rings. Test the faucet to be certain that it is working properly.